

Creating axes
-
Go to the Axes tab in the right panel.
-
Click + (Add axis) above the tree. A new axis appears in the tree.
-
Select the axis. Its Axis Setup window opens in place of the chart.
-
Give the axis a meaningful name such as Pan, Tilt, Left Lift, or Curtain. This name appears in every chart, tree view, and dialog.
A new axis takes its controller Position Range, Speed Range and Responsiveness Gain from Defaults for a new axis in Options (see chapter 14).
To remove an axis, select it and click the bin (Delete axis), or press Delete. Deleting an axis also removes the matching profile from every show.
If the axis has a take in any show, or you have set it up (renamed it, linked a motor or changed its settings), Contours asks first: click Delete axis to go ahead. An axis still as it was added is deleted straight away.
To add an axis set up like the selected one, for example for a second motor, click Duplicate axis. The copy goes directly below the original with Copy added to its name, and has no takes.
Note. The Axes tab is unavailable while the Record screen or the point editor is open. Save or cancel there first.
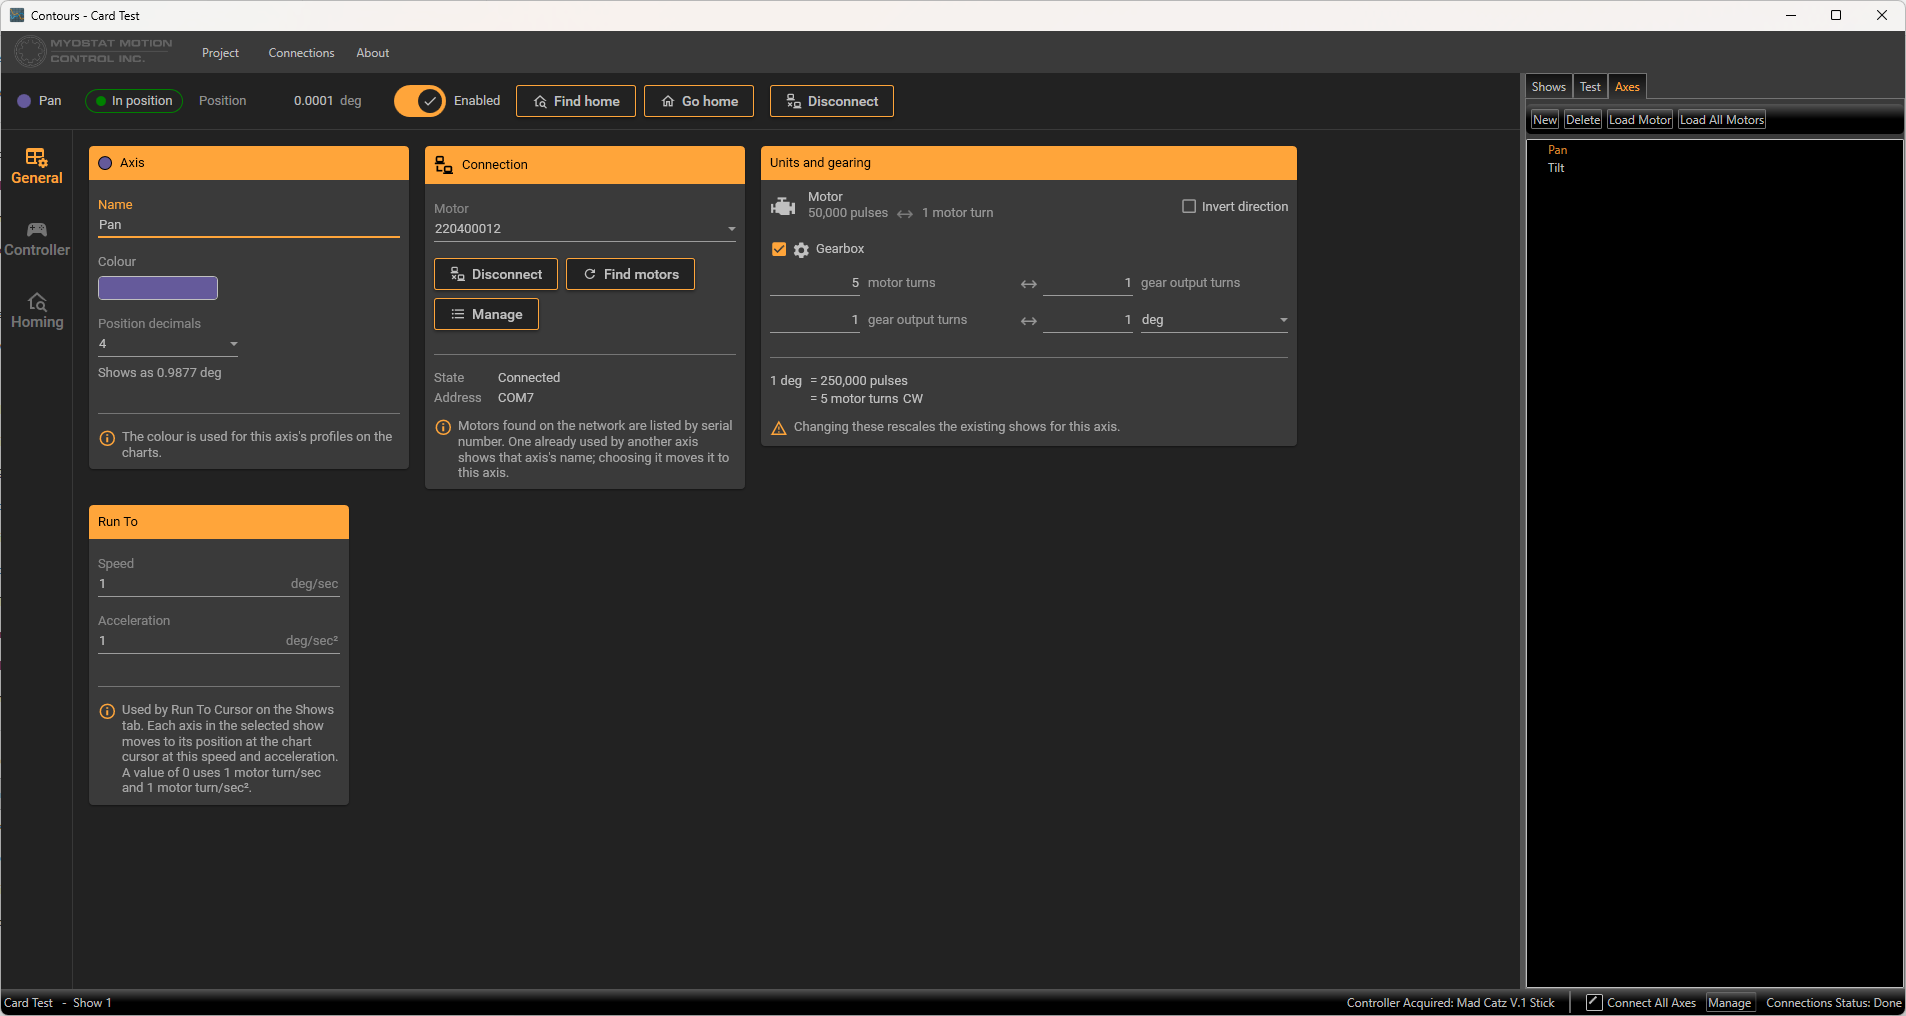
Figure 4. The Axes tab. The Axis Setup window for the selected axis fills the chart area, with its tabs down the left and the controls bar across the top. The toolbar and axis tree are in the right panel.
Until you select an axis, the chart area shows the CoolMuscle logo and Select an axis to edit its setup. If the project has no axes, the axis tree says Add an axis to begin setup instead.
The controls bar

Figure 5. The controls bar.
The controls bar stays visible on every tab. From left to right:
-
Status: the motor's state, such as In position, Moving, Disabled, Overload or Not connected. It turns red for a fault.
-
Position: the live position in the axis's unit.
-
The axis's colour and name, in the middle of the bar.
-
Motor
-
Connect / Disconnect: connects to this axis's motor.
-
Enabled: turns the motor on or off. When it's off, the motor can be turned by hand.
-
-
Homing
-
Find home: runs the motor's homing sequence.
-
Go home: moves the axis to position 0.
-
If the window is too narrow for the whole bar, Find home and Go home move into the ⋮ menu at its right-hand end.
General tab
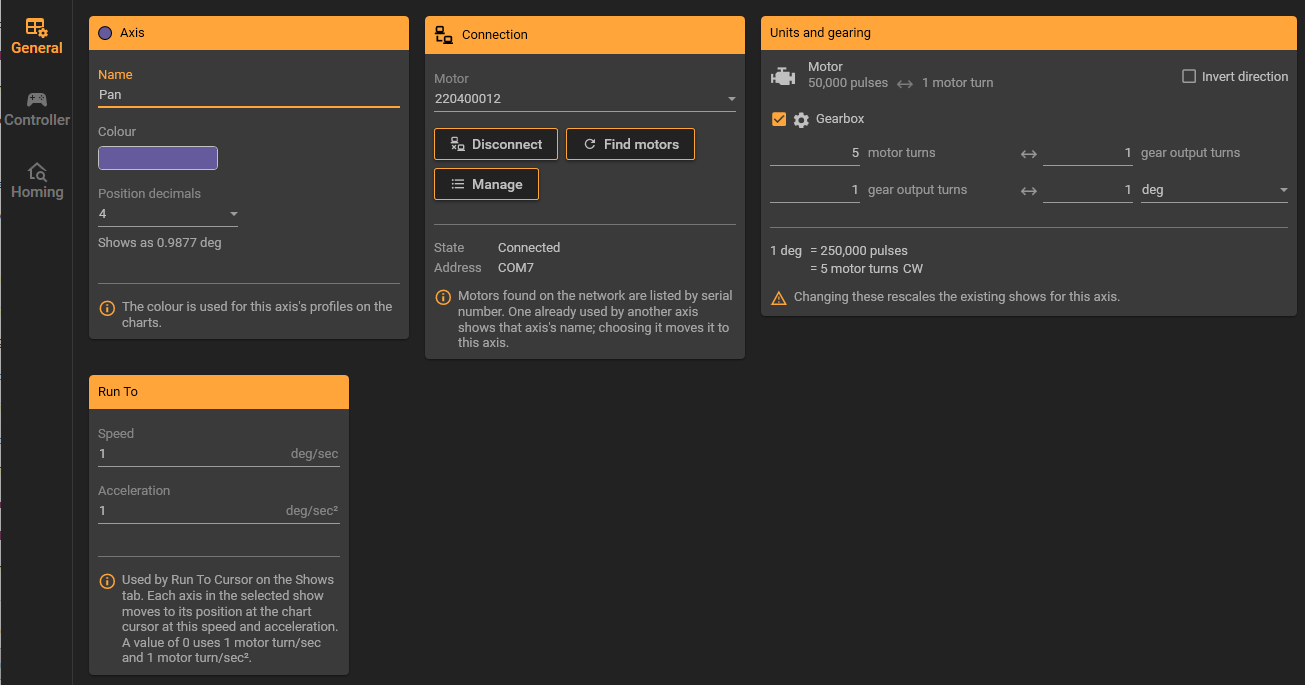
Figure 6. The General tab.
Axis card: the name, colour, and Position decimals, with an example of how positions will look.
Connection card
-
Motor lists the motors found on the network by serial number, with their IP address or COM port.
-
A motor already used by another axis shows that axis's name; choosing it moves it to this axis. You can also type a serial number.
-
Find motors searches again, and Manage opens the Connections panel (see chapter 5). While a search runs, the Motor list is unavailable and a progress bar shows under it.
Units and gearing card: sets how motor turns become your units.
-
The motor always has 50,000 pulses per turn.
-
Tick Gearbox if there is one, then enter it as motor turns ⇔ gear output turns (for example 5 ⇔ 1 for a 5:1 gearbox).
-
Enter the travel per output turn (for example 1 gear output turn ⇔ 360 deg) and pick or type the unit name.
-
The summary shows how many pulses and motor turns make one unit, and which way the motor turns.
-
Tick Invert direction if the axis moves the wrong way.
Caution. Existing shows are stored in the axis's units. Changing these settings rescales every show for this axis.
Run To card: the speed and acceleration used by Run To Cursor on the Shows tab.
Controller tab
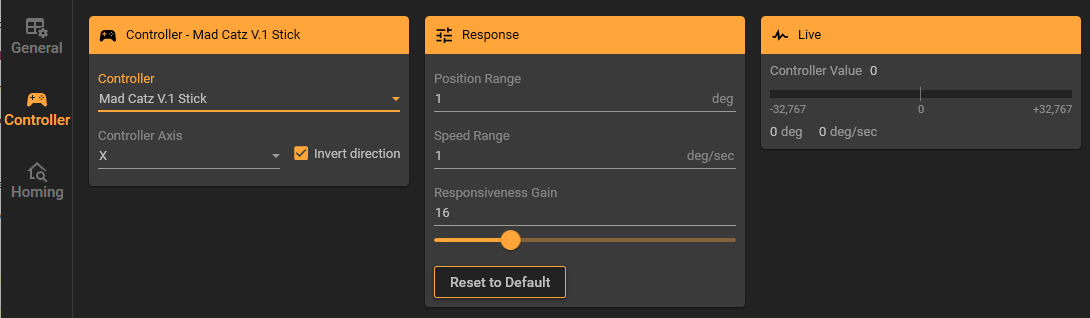
Figure 7. The Controller tab.
-
Controller card
-
Choose the game controller used for recording, and which of its axes moves this axis.
-
Tick Invert direction to reverse it.
-
Controllers plugged in or removed are detected automatically.
-
-
Response card
-
Position Range: the whole travel covered from one end of the stick to the other.
-
Speed Range: the speed at full deflection.
-
Responsiveness Gain: higher values respond faster. Reset to Default sets the default from Options, which is 8 unless you have changed it (see chapter 14).
-
-
Live card: move the stick to see its value and the position and speed it would give.
Homing tab
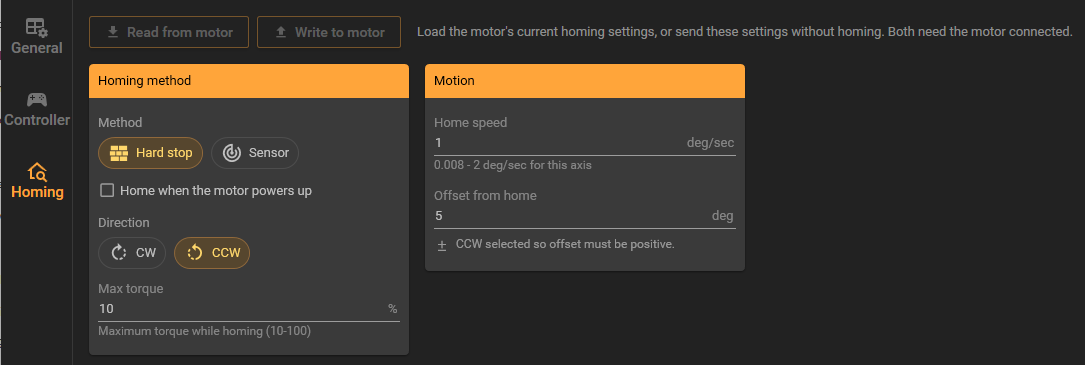
Figure 8. The Homing tab.
-
Read from motor loads the motor's current homing settings.
-
Write to motor sends these settings without homing. The motor keeps them after a power cycle.
Homing method card
-
Choose Hard stop or Sensor, and the direction CW or CCW.
-
Tick Home when the motor powers up to home automatically.
-
Max torque limits the force used while homing.
-
For Sensor homing, choose the sensor input.
Motion card
-
Home speed shows the motor's allowed range in your units.
-
Offset from home is where the axis stops after finding home. The note under it says whether the offset must be positive or negative.
Loading shows into the motors
A motor can hold the project's shows in its own memory, so that the Test tab can run a show from Motor Memory instead of streaming it (see chapter 13). The two buttons at the foot of the axis tree write them:
-
Load motor — writes the takes of every show for the selected axis into its motor. The axis must be connected.
-
Load all motors — does the same for every connected axis in one pass.
Both open the Load motors window, which shows each transfer. Click Done when they finish.
Each show goes into the same place in every motor: the first show in the Shows list is the motor's show 1, the second its show 2, and so on, even in a motor whose axis isn't in every show. Load the motors again after you add, delete or move shows.
Before anything is written, Contours checks that each motor's memory can hold all of the project's shows. If one can't, nothing is loaded, and a message names each axis that doesn't fit, for example Pan: its shows need 112 % of its motor's memory, which holds about 23.9 min of shows at 100 ms. Shorten or delete shows, then load again.
Note. With the current motor firmware, a motor holds about 24 minutes of shows at 100 ms, or about 4.8 minutes at 20 ms, for all of the project's shows together. The import warns you when a take alone is longer than its motor can hold (see chapter 12).
You can cancel a load in progress by clicking Cancel in the Load motors window, or by closing it.