Controlling the Power Drive System
State Machine
The drive state machine is controlled by the Controlword (0x6040) and the status is viewed by the Statusword (0x6041). The state machine can be operated as shown below
There are a few things to note when using the state machine
- When the mode of operation is set to any CiA402 mode the state machine automatically transitions to "Ready to switch on".
- When the transitioning out of "Fault" the state machine automatically transitions to "Ready to switch on".
- Section A
- no torque is present on the motor in Section A regardless of if motor power is present
- Section B
- motor power must be present to transition to "Switched on".
- If motor power is switched off or not present a fault will occur.
- no torque is present on the motor in Section B.
- Section C
- If motor power is switched off or not present a fault will occur.
- Torque is present on the motor in Section C.
- It is possible for the master to transition straight to "Operation enabled".
- See the Controlword description for additional information on state transitions 1-15.
Controlword (0x6040)
The Controlword is used to transition between and set the required states in the state machine.
The Controlword bits are defined as follows:
| Bit | Name | Abbreviation |
|---|---|---|
| 0 | Switch on | SO |
| 1 | Enable voltage | EV |
| 2 | Quick stop | QS |
| 3 | Enable operation | EO |
| 4-6 | Operation mode specific | OMS |
| 7 | Fault reset | F |
| 8 | Halt | H |
| 9 | Operation mode specific | OMS |
| 10 | Reserved | R |
| 11-15 | Manufacturer specific | MS |
- The drive does not support the Quick stop bit and shall be ignored if set to 0.
The following bits are required when transitioning between states:
| Transition | Value (h) | BITS | |||||||
|---|---|---|---|---|---|---|---|---|---|
| 0 (SO) | 1 (EV) | 2 (QS) | 3 (EO) | 4-6 (OMS) | 7 (F) | 8-15 | |||
| 15 | Fault → Ready to switch on | 0x86 | 0 | 1 | 1 | 0 | xxx | 1 | xxxxxxxx |
8/9/0 | Non fault → Ready to switch on | 0x06 | 0 | 1 | 1 | 0 | xxx | 0 | xxxxxxxx |
| 3/5 | → Switched on(1) | 0x07 | 1 | 1 | 1 | 0 | xxx | 0 | xxxxxxxx |
| 4/4a | → Operation enabled | 0x0F/0x1F | 1 | 1 | 1 | 1 | xxx | 0 | xxxxxxxx |
(1) The switched on state is often bypassed by the master.
Statusword (0x6041)
The statusword has the following defined bits
| 15 | 14 | 13 | 12 | 11 | 10 | 9 | 8 | 7 | 6 | 5 | 4 | 3 | 2 | 1 | 0 |
|---|---|---|---|---|---|---|---|---|---|---|---|---|---|---|---|
| ms | oms | ila | tr | rm | ms | w | sod | qs | ve | f | oe | so | rtso | ||
Definitions
- ms = manufacture specific
- oms = operation mode specific
- ila = internal limit active
- tr = target reached
- rm = remote
- w = warning
- sod = switch on disabled
- qs = quick stop
- ve = voltage enabled
- f = fault
- oe = operation enabled
- so = switched on
- rtso = ready to switch on
FSA States
The Statusword indicates the current state of the drive state machine. The following table outlines the Statusword bits and the represented state
| State | Statusword Bits | Functional Meaning |
|---|---|---|
| Not ready to switch on | xxxx xxxx x0xx 0000 | No CiA mode of operation selected |
| Switch on disabled(1) | xxxx xxxx x100 0000 | No motor torque - drive disabled |
| Ready to switch on | xxxx xxxx x01x 0001 | No motor torque - drive disabled |
| Switched on | xxxx xxxx x01x 0011 | No motor toque - drive disabled |
| Operation Enabled | xxxx xxxx x01x 0111 | Motor has torque - drive enabled |
| Fault reaction active(1) | xxxx xxxx x0xx 1111 | Motor is losing torque - drive disabling |
| Fault | xxxx xxxx x0xx 1000 | No motor torque - drive disabled |
| Quick stop active(2) | xxxx xxxx x00x 0111 | Not implemented |
(1) these states are automatically transitioned through
(2) quick stop active is not currently implemented
Voltage Enabled - Bit4
The CM1-E has separate control and motor power. The 24V motor power status can be read through bit 4 on the statusword.
- bit4=1 - 24V motor drive power is detected.
- bit4=0 - motor drive power is not detected.
The voltage DC value is also available on object 0x6079 (DC link voltage).
Modes of Operation
CiA402 defines modes of operation. This allows the user to use the drive in a mode that is most suited to the application.
Modes of operation object list
| Index | Name | Function |
|---|---|---|
| 0x6060 | Modes of operation | Write the required mode of operation |
| 0x6061 | Modes of operation display | Read the current mode of operation set on the drive |
The following modes of operation are available on the drive
| Mode of operation | Abbreviation | 0x6060 value |
|---|---|---|
| Profile Position mode | PP mode | 1 |
| Profile Velocity mode | PV mode | 3 |
| Homing Mode | HM mode | 6 |
| Cyclic Synchronous Position mode | CSP mode | 8 |
| Cyclic Synchronous Velocity mode | CSV mode | 9 |
Switching between modes
The drive is designed for dynamic switching between modes of operation. The "Modes of operation" and "Modes of operation display" are available in the RxPDO and TxPDO respectively. This allows the user to switch modes of operation without changing the ESM out of Operational. It is recommended the motor is put into a safe known state before switching modes. The master should send PDO data to the current mode of operation and the desired mode while switching modes. This should be continued until the "Modes of operation display" indicates the new mode has been set.
Profile Position Mode
Profile position mode provides an effective way to run the motor in position mode with very little overhead on the Ethercat master. The EtherCAT master sets the required acceleration, velocity and position before issuing the run command/bit. Single set-point is implemented which means the master can change the target position, speed and acceleration at any point by updating the values and issuing a new run bit. If the drive is required to continuously update position it is recommended that CSP mode is used instead. The Profile mode PDO mapping or the Dynamic Switching of Modes PDO mapping should be selected to effectively run Profile Position mode. See PDO Mappings for more information.
The following objects are used in Profile Position mode
Object | Name | Value | Unit | Description | PDO Mapped |
|---|---|---|---|---|---|
| 0x6040 | Controlword | - | - | See Controlword for general usage. | Yes |
| 0x6041 | Statusword | - | - | See Statusword for general usage. | Yes |
| 0x6060 | Modes of operation | 1 | - | Sets the mode to Profile Position mode | Yes |
| 0x607A | Target Position | -232 to +231 | pulses | Sets the target position. | Yes |
| 0x6081 | Profile velocity | See CiA 402 - Drives and Motion Control Device Profile#Peak Speeds | pulses/s | Sets the target velocity of the profile. | Yes |
| 0x6083 | Profile acceleration(1) | 0 - 32767 | pulses/s2 | Sets the profile acceleration. The deceleration uses the same value. | Yes |
(1) The acceleration used internally in the drive has a unit of 1000 pulses/s2. As such the value is 0x6083 is rounded to the nearest 1000. If the value is less than 1000 the value of 1000 used.
Use of Controlword and Statusword
The Controlword and Statusword use some additional mode specific bits in Profile Position mode.
Controlword
The following tables show the controlword usage.'
| 15-10 | 9 | 8 | 7 | 6 | 5 | 4 | 3-0 | ||||||||
|---|---|---|---|---|---|---|---|---|---|---|---|---|---|---|---|
| See Controlword | Change on set-point | Halt | See Controlword | abs/rel | Change set immediately | New set-point | See Controlword | ||||||||
| Bit | Name | Value | Definition |
|---|---|---|---|
| 4 | New set-point | 0 → 1 | Next positioning shall be started immediately. |
| 5 | Change set immediately | 1 - N/A | Bit 5 will always be considered a 1 and will be ignored. Change set immediately is always executed |
| 6 | abs/rel | N/A | Absolute positioning is always executed. This bit shall be ignored |
| 8 | Halt | 0 | Positioning shall be executed or continued |
| 1 | The axis shall be stopped using the deceleration value in 0x6083 | ||
| 9 | Change on set-point | N/A | Single set point mode is always executed. Bit9 is ignored. |
Statusword
The following tables show the statusword usage.
| 15 | 14 | 13 | 12 | 11 | 10 | 9-0 | |||||||||
|---|---|---|---|---|---|---|---|---|---|---|---|---|---|---|---|
| See Statusword | Following Error | Set-point acknowledge | See Statusword | Target reached | See Statusword | ||||||||||
| Bit | Value | Definition |
|---|---|---|
| 10 | 0 | Halt (Bit 8 in controlword) = 0: Target position not reached |
| 1 | Halt (Bit 8 in controlword) = 0: Target position reached | |
| 12 | 0 | Waiting for new setpoint |
| 1 | Set point has been processed. | |
| 13 | 0 | No following error. The drive is able to follow the commanded trajectory |
| 1 | Following error. The drive cannot follow the commanded trajectory. |
Single set-point handshaking procedure
Use of acceleration and deceleration value
The deceleration value is always set to the acceleration value.
The acceleration used internally in the drive has a unit of 1000 pulses/s2. As such the value is 0x6083 is rounded to the nearest 1000. If the value is less than 1000 the value of 1000 used.
Profile Velocity Mode
Profile Velocity mode provides an effective way to run the motor in velocity mode with very little overhead on the Ethercat master. The EtherCAT master sets the required acceleration, deceleration and then issues the target velocity. The drive will ramp up to the target velocity.
The following objects are used in Velocity Profile mode
Object | Name | Value | Unit | Description | PDO Mapped |
|---|---|---|---|---|---|
| 0x6040 | Controlword | - | - | See Controlword for general usage. | Yes |
| 0x6041 | Statusword | - | - | See Statusword for general usage. | Yes |
| 0x6060 | Modes of operation | 3 | - | Sets the mode to Profile Velocity mode | Yes |
| 0x60FF | Target speed | See Peak Speeds | pulses/s | Sets the target speed | Yes |
| 0x6083 | Profile Acceleration | 0-32767 | Kpulses/s2 | Profile Acceleration | No |
| 0x6084 | Profile Deceleration | 0-32767 | Kpulses/s2 | Profile Deceleration | No |
Use of Controlword and Statusword
The Controlword and Statusword use some additional mode specific bits in Profile velocity mode.
The Controlword Bit8 is used a s a Halt bit.
| Bit | Value | Definition |
|---|---|---|
| 8 | 0 | The motion shall be executed or continued |
| 1 | The axis shall be stopped using the deceleration value in 0x6084 |
The Statusword implements 2 additional bits to indicate if the target velocity is reached and/or is the current velocity is 0.
| Bit | Value | Definition |
|---|---|---|
| 10 | 0 | Halt (Bit 8 in controlword) = 0: Target not reached |
| 1 | Halt (Bit 8 in controlword) = 0: Target reached | |
| 12 | 0 | Speed is not equal to 0 |
| 1 | Speed is equal to 0 |
Use of acceleration and deceleration value
The deceleration value is only used when the target velocity is set to 0 or the halt bit is set. For all other changes in velocity the acceleration value is used.
Homing Mode
Homing mode can be used to utilize the drives embedded homing routines. These routines allow accurate homing to be achieved without the delays communicating to the controller. The standard Cool Muscle home routines are accessible through the homing modes object. Homing mode does not require any specialized PDO mappings and can be used with any of the standard mappings. See PDO Mappings for more information.
The following objects are used in Homing mode
Object | Name | Value | Unit | Description | PDO Mapped |
|---|---|---|---|---|---|
| 0x6040 | Controlword | - | - | See CiA 402 - Drives and Motion Control Device Profile#Controlword for general usage. | Yes |
| 0x6041 | Statusword | - | - | See Statusword for general usage. | Yes |
| 0x6060 | Modes of operation | 6 | - | Sets the mode to Homing mode | Yes |
| 0x607C | Home Offset | -3276700 to +3276700 | encoder pulses (50 000 per motor revolution) | Once a home sensor or hardstop has been achieved the motor will move the distance of the offset. The final position will be set to 0. This value is written to an internal motor register which has a resolution of 100 pulses. | No |
| 0x6098 | Homing Method | 0 to -6 | - |
See Homing Methods for additional information | No |
| 0x6099:01 | Homing Speed | 1000 - 500000 | pulses/s | The homing speed is written to an internal register which has a unit of 100 pulses/s. The value written into 0x6099 will be rounded to the closest 100. | No |
| 0x609A | Homing Acceleration | 1000-5000000 | pulse/s2 | The homing acceleration is written to an internal register which has a unit of 1000 pulses/s. The value written into 0x609A will be rounded to the closest 1000. | No |
| 0x60F6:1B | Homing Torque | 10-100 | % rated torque | Set the torque during the home routine.
| No |
Homing Methods
Two distinct methods are available when executing a home routine.
- Hardstop detect - the motor moves towards a hardstop. When the hardstop is reached the driver reads the position of the magnetic encoder. It then moves back 2 teeth of the encoder gear to set the absolute position. Moving back the two teeth allows for high repeatability as fatigue and variance in the hardstop detect can be accounted for automatically.
- Sensor detect - the motor moves towards a home sensor. When the sensor is triggered the driver interrupt captures the motor position. The motor decelerates and moves back to the captured position.
- If the sensor is detect when the home routine is first initiated the motor will move off the sensor first in the opposite direction to the defined origin search direction.
Hardstop CW - 0x6098=-1

- Motor runs CW towards a hardstop.
- The driver monitors the motor current and detects when a hardstop has been reached.
- Motor backs up CCW to the 2nd previous encoder tooth (improved repeatability) and sets the position to 0.
- If an offset is set the motor moves the offset distance
- Care should be taken not to set a +ve offset as this will move the load into the hardstop
- Sets the final position to 0.
Hardstop CW - 0x6098=-1
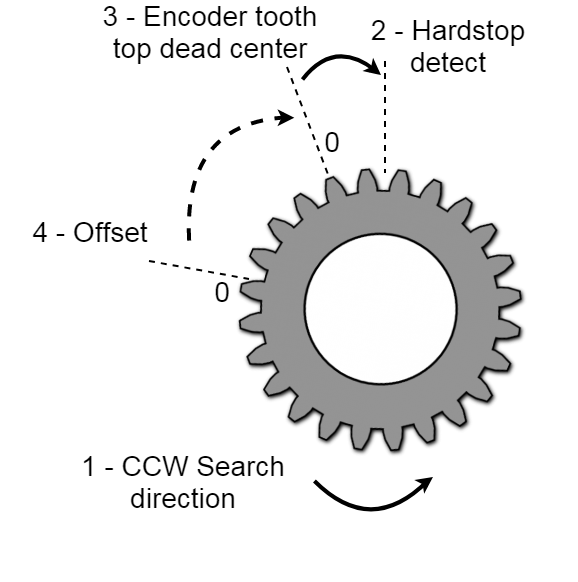
- Motor runs CCW towards a hardstop.
- The driver monitors the motor current and detects when a hardstop has been reached.
- Motor backs CW up to the 2nd previous encoder tooth (improved repeatability) and sets the position to 0.
- If an offset is set the motor moves the offset distance.
- Care should be taken not to set a -ve offset as this will drive the load into the hardstop
- Sets the final position to 0.
Sensor CW - 0x6098=-3 or -5
INPUT2 - 0x6098=-3
INPUT3 - 0x6098=-5
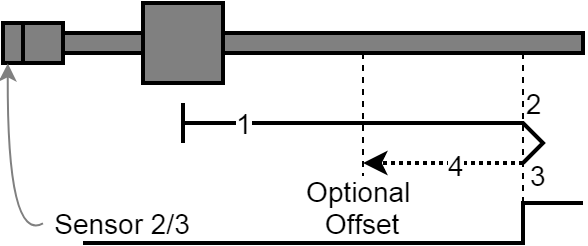
- Diagram shown with motor connected to linear actuator.
- CW rotation moves the load left to right
- Sensor is connected directly on IN2 or IN3
- Motor runs CW waiting for sensor input
- Sensor rising edge triggers the input, motor captures encoder position, decelerates and reverses direction
- Motor stops on captured position and sets position to 0
- If an offset is defined the motor continues to the defined offset and sets the final target position to 0.
- Offset could be +ve or -ve. The above diagram shows a -ve offset
Sensor CCW - 0x6098=-4 or -6
INPUT2 - 0x6098=-4
INPUT3 - 0x6098=-6
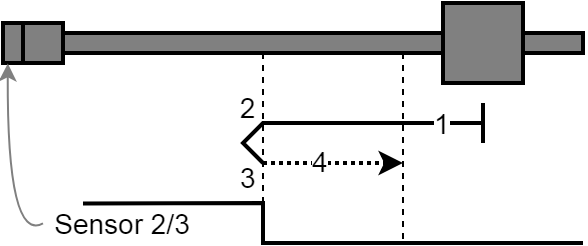
- Diagram shown with motor connected to linear actuator.
- CCW rotation moves the load right to left
- Sensor is connected directly on IN2 or IN3
- Motor runs CCW waiting for sensor input
- Sensor rising edge triggers the input, motor captures encoder position, decelerates and reverses direction
- Motor stops on captured position and sets position to 0
- If an offset is defined the motor continues to the defined offset and sets the final target position to 0.
- Offset could be +ve or -ve. The above diagram shows a +ve offset.
Use of Controlword and Statusword
The Controlword and Statusword use some additional mode specific bits in Homing mode.
Controlword
The following tables show the controlword usage.
| 15-9 | 8 | 7 | 6-5 | 4 | 3-0 | ||||||||
|---|---|---|---|---|---|---|---|---|---|---|---|---|---|
| See Controlword | Halt | See Controlword | reserved (0) | Homing operation Start | See Controlword | ||||||||
| Bit | Name | Value | Definition |
|---|---|---|---|
| 4 | Homing operation start | 0 → 1 | Start or continue homing procedure |
| 8 | Halt | 0 | Enable bit 4 |
| 1 | The axis shall be stopped using the deceleration value in 0x609A |
Statusword
The following tables show the statusword usage.
| 15-14 | 13 | 12 | 11 | 10 | 9-0 | ||||||||||
|---|---|---|---|---|---|---|---|---|---|---|---|---|---|---|---|
| See Statusword | Homing Error | Homing attained | See Statusword | Target reached | See Statusword | ||||||||||
General Definitions
| Bit | Value | Definition |
|---|---|---|
| 10 | 0 | Homing procedure is in progress |
| 1 | The motor has reached its target position or is currently disabled via the controlword | |
| 12 | 0 | Homing not attained.
|
| 1 | Homing attained
| |
| 13 | 0 | No home routine error |
| 1 | Home routine error |
Bit Sequence
| Bit 13 | Bit 12 | Bit 10 | Description |
|---|---|---|---|
| 0 | 0 | 0 | Homing procedure in progress |
| 0 | 0 | 1 | Homing procedure is interrupted or not started
|
| 0 | 1 | 0 | Homing is attained, but target is not reached
|
| 0 | 1 | 1 | Homing procedure is completed successfully. Current position is set to 0.
|
| 1 | 0 | 0 | Homing error occurred, velocity is not 0 |
| 1 | 0 | 1 | Homing error occurred, velocity is 0 Occurs if any motor error occurs. |
| 1 | 1 | 1 | An error exists but a home routine has been completed. |
Cyclic Synchronous Position Mode
Cyclic synchronous position mode is set by setting the Modes of operation to 8. CSP mode is designed to allow the master controller full control of the position target. The 0x6064 position target shall be updated every PDO cycle. Failure to update the position target at the defined PDO interval will result in noisy and poor motion.
The following objects are used in CSP mode
Object | Value | Unit | Description | PDO Mapped |
|---|---|---|---|---|
| 0x6040 | - | - | See Controlword | Yes |
| 0x6041 | - | - | See Statusword | Yes |
| 0x607A | -232 to +231 | pulses | Target position | Yes |
| 0x6064 | -232 to +231 | pulses | Position actual value | Yes |
| 0x6060 | 8 | - | CSP mode set | Yes |
- Additional PDO objects are available. See PDO Mappings.
Use of Controlword and Statusword
No additional Controlword and Statusword bits are implemented.
Cyclic Synchronous Velocity Mode
Cyclic synchronous velocity mode is set by setting the Modes of operation to 9. CSV mode is designed to allow the master controller full control of the instantaneous velocity target. The 0x60FF velocity target shall be updated every PDO cycle. Failure to update the position velocity at the defined PDO time interval will result in noisy and poor motion.
The following objects are used in CSP mode
Object | Value | Unit | Description | PDO Mapped |
|---|---|---|---|---|
| 0x6040 | - | - | See Controlword | Yes |
| 0x6041 | - | - | See Statusword | Yes |
| 0x60FF | See Peak Speeds | pulses/ms | Target velocity | Yes |
| 0x606C | See Peak Speeds | pulses/ms | Velocity actual value | Yes |
| 0x6060 | 9 | - | CSV mode set | Yes |
- Additional PDO objects are available. See PDO Mappings.
Motor maximum speeds
| Part number | Max Speed RPM | Max 0x606C (Target velocity) |
|---|---|---|
| CM1-E-17S30D | 3000 rpm | -2,500,000 to +2,500,000 |
| CM1-E-17L30D | 3000 rpm | -2,500,000 to +2,500,000 |
| CM1-E-23S30D | 3000 rpm | -2,500,000 to +2,500,000 |
| CM1-E-23L20D | 2000 rpm | -1,666,667 to +1,666,667 |
Use of Controlword and Statusword
No additional Controlword and Statusword bits are implemented.
Motor Peak Speeds
The four supported motors have differing peak speeds. See the table below for each motors maximum speed
| Model Number | RPM | Pulses/s | Pulses/ms |
|---|---|---|---|
| CM1-E-17S30D | 3000rpm | 2500000 | 2500 |
| CM1-E-17L30D | 3000rpm | 2500000 | 2500 |
| CM1-E-23S30D | 3000rpm | 2500000 | 2500 |
| CM1-E-23L20D | 2000rpm | 1666666 | 1666 |
Overview
Content Tools